Powered By Blogger

Wednesday, October 27, 2010

Plating Creates Options

With the price of metal these days, I am always looking for more ways to create reasonably priced art jewelry. I looked into plating my designs as an affordable alternative to create a high-end look without the high cost. I decided to do a test exercise on several pieces trying out gold, fine silver, and rhodium plating.

The photos below show hammered cuffs in red brass before plating and after plating in 22kt gold. I requested a heavy plating for the cuffs.

Red brass cuffs before plating

Cuffs plated in 22kt gold, oxidized finish
I had several sterling silver pieces plated in fine silver to minimize tarnishing. Fine silver is .999 pure and has a lovely white finish.
Fine silver plating over sterling silver
The sterling silver rings below were plated in rhodium. Rhodium is in the platinum family and is often used over platinum, white gold or sterling silver. It is white, highly reflective, hard, and does not tarnish. Its hardness makes it great for finishing rings. Sterling silver scratches easily, but with a rhodium finish the surface is protected with a hard shell. I personally like the color of sterling silver and don't mind the scratches or light tarnish. I think this adds character to the jewelry. I'm not sure if I'll use rhodium for future rings, but I do have another option.


Plating can also be used as a design element to create a bi-metal look. An area can be masked to protect the metal prior to plating. The hammered cuffs above could have been plated in gold and silver, or for a more dramatic look, white and black rhodium.

The pendant on the left shows how a bi-metal look can be achieved using a plated bronze pod that is hinged to a sterling silver bezel set agate.


While plating may not be the solution for every project, it gives me options. I can create a signature look with rose or green gold or even black rhodium, add sophistication to copper or brass, or just prevent silver from tarnishing. I am blown away with the new options available to me with this process.

I love sharing what I've learned and hope you find this information helpful. Check out the yellow pages to find a plating company in your area.

To see my handcrafted artisan jewelry visit my etsy shop, www.LisaMiwa.etsy.com

Tuesday, October 26, 2010

Lovely Ocean Jasper


I just love ocean jasper or orbicular jasper. The stone is a combination of agate, quartz, and trace metals. It is known for its beautiful orbs, wavy lines and gorgeous colors and patterns. Ocean jasper is a rare material that comes from a remote location in Madagascar. It has been mined out and is one of the most sought after collector stones in the world. Quality specimens sell for hundreds of dollars.

I was lucky to be given a piece of ocean jasper. The stone is red, white, and green and mostly opaque with several orbs. My brother-in-law cut this stone with beveled edges and a flat face. This material takes a beautiful lustrous polish.

When designing with stones with multiple colors and patterns, I often opt for very simple settings. The gemstone should be the focal point, not a busy or fussy setting. For this gemstone, I create a classic bezel setting with an open back. I roller printed a paper towel texture on the backside to minimize fingerprints. The bail is made out of double half round wire and soldered to the back of the frame. The glint of the high polished bezel against the ocean jasper and the snake chain give this pendant a sleek modern appeal.

The handcrafted pendant is a gift for my brother-in-law's sister. This note was included with the finished piece:
Ocean Jasper, also called Orbicular Jasper, is found only on the coast of Madagascar and is mined at low tide. Ocean Jasper has dots, wavy lines and comes in multi-colored designs of green, pink, red, black, white, and blue. This stone is said to increase your expression of love in words and actions and bring into focus the positive and relaxing aspects of home life and business. It is also believed to lift negativity so you can fully appreciate your blessings as well as ease and balance emotional stress.

For more handcrafted artisan jewelry visit my Etsy shop, LisaMiwa.etsy.com.

Saturday, October 23, 2010

Inspired by Nature


Koko at Pt. Fermin Park
My artisan jewelry nature series is inspired by walks along Paseo Del Mar on the Palos Verdes Peninsula. Koko and I are lucky to have a beautiful scenic view while we both get our exercise. She sniffs and I look for interesting subject matter. There is so much inspiration - the wintery stormy seas, the whale migration in spring and the end of summer, squidding time, the tidal pools. The beauty of the area fills me up.

Winter is the best time to collect... right after a storm when the wind cleans the trees for spring. The park has all sorts of interesting subject matter - twigs, pods, flowers, peanut shells and pine cone cobs eaten by squirrels. To create my nature series, I chose several pods, leaves, and twigs to cast in silver or bronze. I also selected several interesting lapidary slabs to fashion into cabochons.

Here are photos of some of the handcrafted pieces I created. Each piece has a story.


Tidal wave - inspired by the February 2010 tsunami warning in southern California. The blue lace agate's raw edge and the waves in the stone reminded me of the swollen ocean and frothy waves on that day.


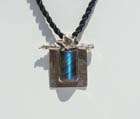
Blue Light - inspired by the moonlight on the ocean at night. In the summer, I often walk at night. It is beautiful when the light of the full moon reflects on the ocean.


Seascape - inspired by Catalina Island and the abundant seaweed along the coast.  I always pause to look at the breathtaking view.


Fortnight Lily Pods with Tahitian Pearl drops - natural pods found on one of my walks. I love the organic texture of the pods.


To see more "Inspired by Nature" handcrafted artisan jewelry visit, LisaMiwa on Etsy.
For my one-of-a-kind beaded gemstone jewelry, visit www.LMJewels.com.

Tuesday, October 19, 2010

Shapeshifting Metal


Inspiration came knocking at my door with a two day fusing workshop with Marne Ryan. She hand-fabricates each of her designs by fusing sterling silver patterns to a base sheet. Much of her work uses 24 karat gold and sterling silver. Photos of her work can be seen at www.MarneRyan.com.

Marne generously shared her 30 years of knowledge, showing numerous demonstrations of fusing sterling silver in different patterns and the specifics on how each pattern is created. The variety of patterns are limited only by one's imagination! There is a definite technique to fusing- the intensity of the flame, how closely the flame is held to the metal, waiting for the flash of melting metal. The sterling silver used in this project is made by Hagstoz & Sons. Marne says sterling silver is not created equal. She has tried other manufacturer's sterling silver with poor results.

After the demonstration, we were given our sterling silver metal packets to create our own fused patterns. I was so excited, imagining richly textured patterns created from wire and pieces of textured sheet metal.


The photo to the left shows the preparation of pieces for fusing. This pattern will look like bamboo leaves. Each piece is folded in half to give the piece depth and is filled edge to edge.


More pieces are added to the first fused layer. Once all fusing is completed, the sheet is flattened in the rolling mill. Now, the sheet is ready to create your design.


Now, what to make with my metal packet? Marne's silver and gold bangles are so attractive, I decided I needed to have one. A pattern with a smaller design would look better on a 1/4" wide bangle bracelet. So I chose a checkerboard pattern design made with 1/2" x 1" pieces of sheet metal that are folded in half, then rolled through the wire portion of the rolling mill. These pieces are opened and flattened, then placed on a fluxed 2" x 3" silver sheet for fusing. The first time you fuse, don't forget to breathe. In the space of a couple of minutes I had to judge flame size, the distance of the flame to the metal, remember not to flick the torch when I saw the metal melting, and watch for the flash of metal fusing. Wow, what a rush!


This is what the fused sheet looks like. 


Fusing is counter-intuitive to soldering. Your mind is screaming "pull the flame away" when you see the metal melting. But to fuse, a steady flame is required on the area until the flash of melting metal is visible before moving on to the next area. Once the piece is fused, pickle, rinse and dry, followed by flattening in the rolling mill.

To make the bangle, three 1/4" wide x 3" long patterned pieces are cut from the patterned sheet and placed  on a 1/4" wide base strip. The patterned sheet is not thick enough alone, so the pieces are soldered to a supporting sheet. The ends are overlapped, one end over the other, then sweat soldered to the base strip. The piece is pickled, rinsed and dried, then formed into an oval bangle. The ends are soldered together, then it is formed on a bracelet mandrel. Final steps include filing, sanding, polishing, and patina. I was able to achieve a golden patina to simulate the 24 karat gold Marne uses in her designs.

I am elated with what I accomplished during this class. My bangle looks like a million bucks! This technique produces such wonderful textured patterns that are to die for. I see earrings, pendants, and more bangles in my future! It's not difficult, just requires nerves of steel until you get used to the technique. Stay tuned for my own original fused designs, coming soon!

Many thanks to Marne Ryan for a great workshop. You can see her in person at the Contemporary Crafts Market on November 5-7 at the Santa Monica Civic Auditorium.

Sunday, October 10, 2010

Hanging from a Hinge


After making all of the hinges in the hollow form bracelet, I started thinking about other ways to use hinges in my designs. I've seen hinges used in many types of jewelry, but never used them because it seemed too difficult to execute. What I like about the hinge is its functionality and sophistication. My next two pendants are designed with a bail that connects to the main setting with a hinge.

Modern Turquoise Pendant

The bail is created in the same manner as the hollow form bracelet in my 'Summer Bliss' post. A rectangular form is created with holes for a chain and a tube for the hinge. The setting for the turquoise is made using a roller printed silver sheet used face up so that texture is visible around the base of the bezel. The bezel and tube for the hinge are soldered in place. The pieces are pre-polished, riveted together, then set with a turquoise cabochon. I like the seamless transition from the bail to the setting with the hinge element.


Rose Labyrinth


The next pendant includes a hinge with a cast eucalyptus pod and a pink moss agate cabochon. I fabricated a half-moon shape for the bail from a 1/8" strip of metal that spans the diameter of the back of the pod. The opening is large enough to accommodate a thick chain. The bronze pod is embellished with a bezel set rhodolite garnet and a soldered tube for the hinge.


The setting for the agate is textured around the perimeter and on the bezel. The stamped and hammered metal has a rich look and complements the organic texture of the eucalyptus pod. The parts are pre-polished, then riveted together. Once the stones are set, the piece is given a final polish.

I really love the hinges in my new pendants. They were easy to make and give me another design option to create movement and flexibility. This is especially helpful when the pendant is on the large side. Before using hinges, my options would have been to solder the parts together (a large piece would be stiff) or connect them with jump rings.

I say thumbs up for hinges!

Thursday, September 9, 2010

Tink, Tink, Tink


Today, I was inspired to finish two cuff bracelets made from Nugold.

They were already cut to size so my next step was to create the design. I decided on a hammered texture combined with stamping for one, and a hammered texture with a roller printed stripe for the other.

Hammering is therapy for me. The tink, tink, tink of the hammer on the metal puts me in a meditative state. I hammer and examine, hammer and examine, and repeat again and again. The process is easy, and pretty fast. And, the gratification comes quickly for this project.

Cuff #1 has a "v" shape pattern made with a pointed tool. I hammer short linear lines inside each "v" area. I think using two textures makes for a more interesting piece.

Cuff #2 has recessed wide roller printed stripes. I decide to hammer a linear pattern in each raised area. I like the contrast between the smooth recessed area and the linear lines.

I complete the look by hammering the side edges. The cuff is turned on its side for this step. I think this extra detail gives the cuff a more finished look.

The last step is to send these off to be gold-plated, followed by a patina. Yeah! Don't you just love it when a project turns out great!

Wednesday, September 1, 2010

Summer Bliss

Wow, summer is coming to a close, kids are back in school, and fall is quickly approaching. My summer went by so quickly because I was able to take a jewelry making class from Brad Smith. Brad's classes are always full so registration is by lottery. I got really lucky when they pulled my name from the wait list!

The summer project was to construct a hinged bracelet of hollow links of our own design with a box clasp. I was so excited that I would learn how to make this clasp. This is the kind of clasp used on high-end jewelry. We had twelve sessions to complete our project. It was a challenging assignment when first presented, but each step was first discussed, then followed by a demonstration. Everyone was so proud of their bracelets. Photos are posted on the Venice Metal Facebook page.

What did I learn?
  1. I love jigs. Jigs make it easy to make multiples. And, I have my plastic jig to use for future projects - just alter the design for an entirely different look. I am going to make more jigs for future projects.
  2. Paste soldering was a great revelation to me. So much quicker than using chip solder. We were shown how to condense the number of soldering operations. Wow, the thought of higher productivity dangles before me.
  3. Hinge making, while not difficult, just requires me to really focus on the task at hand. One wrong cut and you have a do-over.
  4. The box clasp is the best feature of this bracelet. It adds sophistication to the piece and looks more complicated than it really is. The step-by-step instructions made it an easy task.
I am so happy with my 'Summer Bliss' bracelet.


I liked this project so much that I got a head start on my holiday gifts. I made a pair of clip-on earrings and a pendant set with a peridot.


If you are interested in jewelry making, checkout classes taught by Brad Smith at the Santa Monica Adult School. This project has inspired two new creations that I'll share in a future post.

Don't stand on the sidelines. Be inspired to create!